

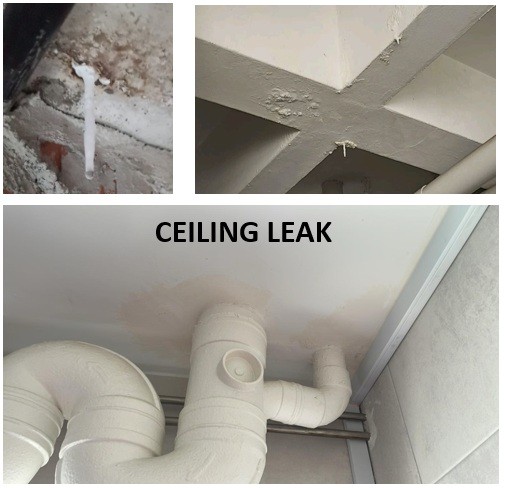
A brown mark on the ceiling is easy to spot. The source of the water may be several metres away, hidden above a concrete slab, behind a wall, or inside a pipe. That is why painting over a ceiling stain rarely solves the problem. To stop a true source of a ceiling leak for good, the water’s entry point and travel path need to be identified before repairs begin.
For homeowners and property managers in Singapore, this matters especially in bathrooms, kitchens, balconies and roof areas exposed to frequent rain and humidity. A small patch can be the first visible sign of a larger waterproofing failure.
What causes a ceiling leak?
The visible drip is often not directly below the source. Water can travel along a concrete slab, a beam, a pipe, a construction joint or the underside of a waterproofing layer before finding a weak point to emerge. A true source of a ceiling leak may therefore originate in the unit above, an external wall, a roof, a concealed pipe, or a shared building element.
One common cause of an inter-floor leak is a failed wet-area waterproofing system in the upper unit. A waterproofing membrane worn out beneath bathroom or toilet tiles may let water pass through the screed and concrete slab. The leak may appear below the shower, but it can also show up near a beam or wall some distance away. Repeated water exposure can contribute to concrete slab damage, staining and deterioration if left unchecked.
Cracks and joints are another route. Concrete naturally moves slightly as temperature and moisture conditions change. Over time, microcracks or a concrete grout hairline crack can form or reopen. Concrete grouting expansion, building settlement, vibration and ageing materials can all play a part. Wall joint cracks, gaps around pipe penetrations, or sealant worn off due to heat expansion may also admit water. A small seal damage at a junction can become a route for persistent water seepage.
Not every leak is a waterproofing problem. A concealed pipe leak in a pressurised water line can leak even when no one is using a shower. A waste pipe leak may appear only when a basin, washing machine, floor trap or toilet is used. A roof leak or façade defect can show up after heavy rain and wind. Poor workmanship during an earlier renovation or repair can leave pinholes, incomplete membrane coverage or weak joints. In some cases, condensation from a cold pipe or air-conditioning system can look like water damage, though its cause and repair differ.
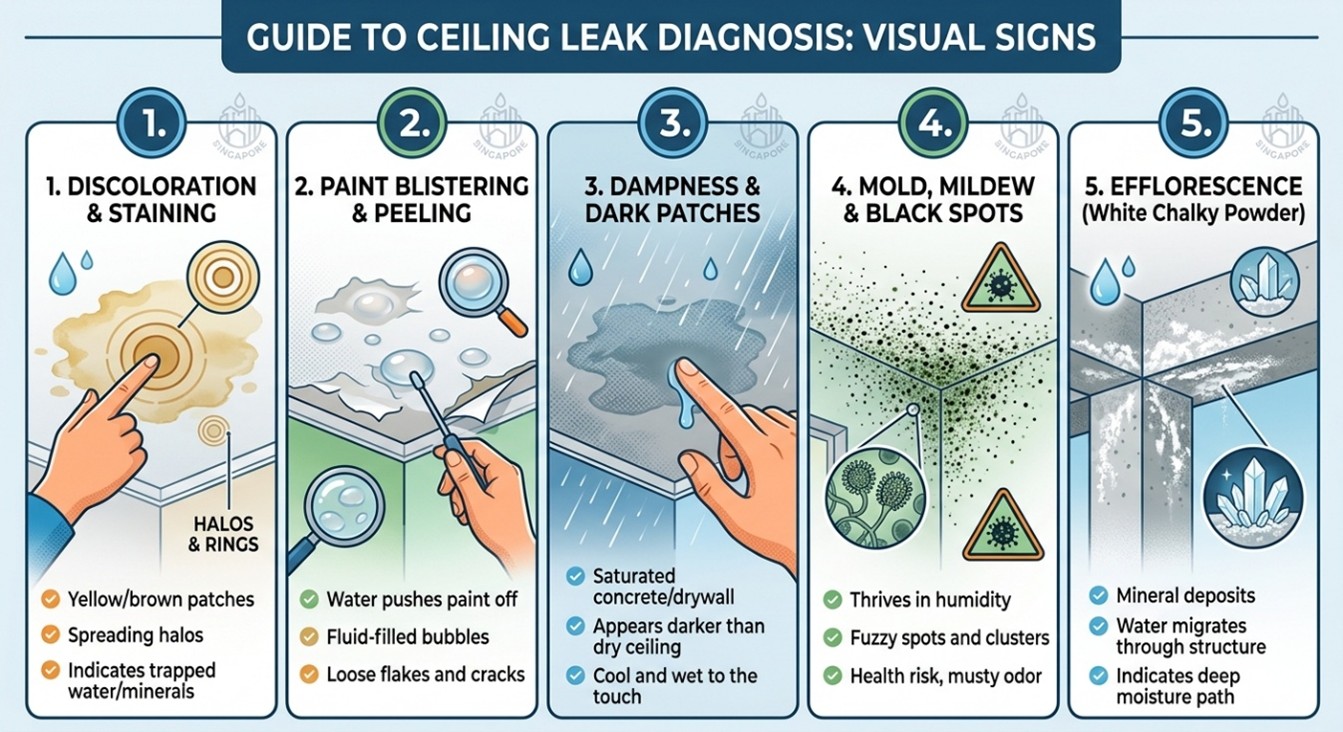
Signs and symptoms to spot
1. Discoloration & Staining
Water trailing through concrete or drywall dissolves minerals, salts, and dirt, bringing them to the surface. As the water evaporates, it leaves behind yellow, brown, or brownish-grey halos or rings.
In the initial stage, it looks like a faint water stain. Over time, multiple wet/dry cycles create concentric bands (similar to tree rings) as each leak event expands the perimeter.
If the stain grows or turns darker right after someone upstairs takes a shower or after a heavy storm, it pinpoints an active, ongoing leak rather than an old, dried stain.
2. Paint Blistering & Peeling
Paint forms an airtight, moisture-resistant barrier over ceiling plaster or concrete. When water forces its way from behind the paint, the trapped moisture disrupts the adhesive bond, causing the paint layer to stretch into fluid-filled bubbles or stretch marks.
Blistering looks like raised “pockets” or soft bubbles on the ceiling. Once the water within the bubble dries or ruptures, the paint membrane cracks, curls, and flakes off in dry strips.
Soft, flexible bubbles surfacing on the ceiling mean water is actively pooled directly behind the paint.
3. Dampness & Dark Patches
High-porosity concrete slabs and gypsum boards absorb water like a sponge. Before paint fails or discolours significantly, saturated material simply looks darker than the surrounding dry ceiling.
Touch the area gently using a tissue or paper towel. If it feels cool, clammy, or leaves moisture on the tissue, the leak is current.
Especially in bathrooms with false ceilings, damp patches are best spotted by shining a torch light upwards through access panels to inspect the bare concrete slab above.
4. Mold, Mildew, & Black Spots
Mold spores are always present in the air and germinate within 24 to 48 hours when exposed to consistent organic moisture and warm ambient temperatures—conditions abundant in Singapore’s humid environment.
It begins as tiny cluster spots of black, dark green, or fuzzy grey specks, often along ceiling corners, cornices, or around light fittings where ventilation is poor.
It is due to surface condensation from an over-cooled room that causes widespread, light surface mildew, whereas an internal pipe or slab leak typically causes dense, concentrated mold growth in one specific area.
5. Efflorescence (White Chalky Powder)
Water traveling through concrete or tile grout lines dissolves free lime and calcium salts. When this water reaches the underside of the ceiling and evaporates, it leaves behind crystalline mineral deposits.
It appears as a white, powdery, or salt-like crust clinging to the ceiling or tile joints.
Efflorescence proves that water has fully migrated through a masonry or concrete structure, confirming a deep structural path rather than simple surface splash.
Simple observations can narrow the possibilities, but one clue is rarely proof. A stain below a bathroom does not automatically mean the bathroom floor membrane failed: the path could be a waste pipe, a supply pipe or a joint. Similarly, a roof leak may travel along a beam before appearing indoors.
For a suspected pipe leak, a plumber can isolate lines, inspect fittings and conduct suitable pressure or flow checks. For suspected waterproofing failure, a specialist may inspect the floor and wall junctions, drains, penetrations, grout and slab below.
Thermal leak detection may useful information by showing surface temperature patterns associated with moisture or active water movement. It is a high-tech diagnostic aid. Some cases, such as sunlight, air-conditioning, different materials and recent water use can affect readings, so an experienced operator should interpret the image alongside site observations.
What to do if the leak is through an inter-floor concrete slab
Notify the upstairs owner or occupier and the building’s managing agent or MCST as soon as possible. Share photos and dates, and agree on access for inspection.
For HDB flats, follow the relevant HDB process for inter-floor leakage and allow the parties or appointed inspectors to assess the source.
In a condominium or commercial building, the managing agent can help coordinate access and establish whether the affected slab, pipework or waterproofing belongs to a private lot or common property.
Reduce water use in the suspected area until the cause is understood. This does not mean shutting off essential services without coordination. If there is active dripping, protect belongings and use a container; if the ceiling is bulging, keep people away at that area and report it urgently. Do not cut open a slab or ceiling casually, seek professional assist. Hacking may be needed in some situations, but it can create dust, noise and disruption and should follow a proper scope and approval process. The repair should address the route of ingress, not merely patch the visible ceiling stain.
How is a ceiling leak repaired?
The correct waterproofing solution treatment depends on the source and condition of the concrete substrate. A plumber may repair or replace a faulty pipe. A failed wet-area membrane may require work from the upper side, such as removing finishes and renewing waterproofing. An external wall leak may call for joint or façade repairs. A localised crack or water-bearing construction joint in a concrete slab may be suitable for injection grouting. Surface repainting and ceiling waterproofing from below can restore appearance only after ingress has stopped and the substrate is appropriately dry and prepared.
PU Injection grouting
PU Injection grouting is one possible non-hacking waterproofing method for certain active cracks and joints. A trained contractor drills small injection ports into the concrete near the leak path and injects polyurethane grout under controlled pressure. When the grout contacts water, it expands or reacts to form a seal within the crack or void. The precise product and method depend on the leak, concrete condition and manufacturer’s instructions. It is not a universal fix for a broken pipe or a widespread, failed membrane, and the contractor should explain whether complementary surface treatment is needed.
For homeowners, the practical appeal is less invasive access from the underside of the slab. In a suitable case, injection can avoid removing the upstairs bathroom tiles and screed, reducing hacking noise, dust, debris and the period that a bathroom or room is out of use. The work area can be smaller, and the household may avoid a major reinstatement project. “Non-hacking” does not mean no drilling at all: small access holes are typically made and later patched. Nor does it guarantee that no other work is required. If investigation shows the membrane has broadly failed, a top-side repair may still be the more complete solution.
Good workmanship matters. The injection points must intersect the water path, the pressure must be controlled, and the concrete must be assessed for cracks, spalling or other defects. After treatment, the area should be monitored and the access holes made good. Document the suspected source, proposed treatment, limitations and any warranty coverage. A clear scope reduces the risk of repeating a patch that treats only the symptom.
How to determine the source of a ceiling leak?
Water Ponding Test
A ponding test directly challenges a selected waterproofed surface with water. Its strength is that it can provide persuasive evidence that the tested area leaks under the test conditions. Its drawbacks are time, the need to contain water, possible disruption to the upper unit, and the fact that it tests only the chosen area. Water may also take time to travel through a slab, so a negative or inconclusive result does not always rule out an intermittent leak.
Thermal Leak Detection
When visual checks do not reveal the cause, a structured investigation can combine observation, controlled testing and instruments. A water ponding test deliberately holds a shallow, controlled amount of water on a waterproofed area—often a bathroom floor or balcony—to see whether leakage appears below. The test can help determine whether that tested area contributes to the leak, but it takes time and requires safe containment, permission and monitoring. It may be inappropriate if there is already significant leakage, if the structure or finishes are vulnerable, or if flooding could affect neighbours.
A thermal leak detector uses an infrared camera to record surface temperatures. Moisture can alter how a surface warms or cools, so a thermal image may reveal a cooler or warmer pattern that merits closer inspection. The operator compares the image with visible conditions and other measurements to map likely damp zones or trace a suspected route. Thermal imaging is non-invasive and can survey a wider area quickly, which is useful when the ceiling mark is far from the source or the pathway is concealed.
Thermal imaging does not see through concrete or directly photograph water inside a slab. It detects temperature differences at the surface. A competent inspection may therefore combine thermal imaging with moisture readings, plumbing checks, targeted opening or a carefully designed water test. A thermal scan is most useful when there is enough temperature contrast and the operator knows the building layout and recent water-use history. Results should be treated as evidence to guide the next step.
Thermal leak detection is faster to survey, does not add water, and can help narrow a broad or concealed moisture pattern without removing finishes. It is particularly useful as part of a mystery-leak investigation when the stain location is misleading. Its limitation is that temperature patterns are indirect: other heat sources or surface materials can create similar contrasts, while a small or inactive leak may not produce a clear signature. It cannot by itself confirm the exact defect.
Thermal imaging can guide where to investigate; a controlled ponding test, plumbing test or other targeted check can then confirm or rule out a specific source. The right sequence depends on the symptoms and risks at the property. A good investigator explains what each result means and what uncertainty remains before recommending repair.
SWC Construction provides waterproofing and water-leak investigation services in Singapore for homeowners, commercial building maintenance teams and MCST maintenance teams. We are BCA-registered waterproofing contractor, BizSAFE Level 3 certified and an HDB-appointed waterproofing contractor, and its website features customer feedback and Google review links. Its services include leak detection, PU Injection grouting and other waterproofing treatments; the suitable approach depends on the site inspection and confirmed cause.
If you are dealing with a ceiling stain, ceiling mould, toilet water seepage, a suspected roof leak or another waterproofing leak, contact SWC Construction to arrange an on-site survey and inspection. The team can assess the leak path and provide a customised repair proposal for your waterproofing works. Call +65 8754 4058 to make an enquiry.