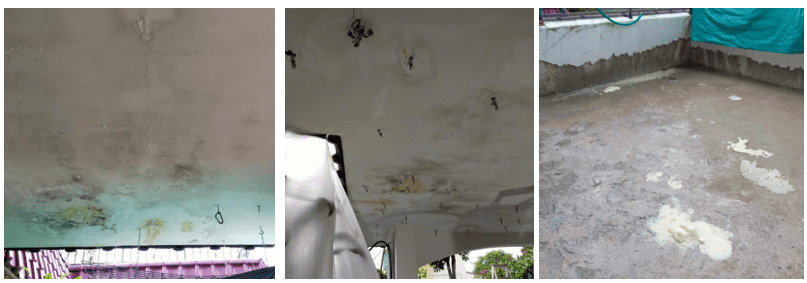
Given that the climate in Singapore is hot, humid and rainy throughout the year, it is inevitable for building elements and materials such as concrete walls or other porous surfaces to deteriorate at a faster rate. With temperature changes every day, different materials expand and contract at various rates where some are more affected than the others. Over time, this differential movement will result in misaligned joints and cracks which will cause water ingress and leakages into the interior of a property.
If these cracks and voids are left unattended in the long run, they may eventually increase in size and could potentially weaken the structural integrity of the property. Hence, we often advocate home owners to inspect these cracks and water leakages early so as to take the necessary actions in resolving them promptly to protect their homes.
In this article, we will delve into details on one of the most effective waterproofing solution – Polyurethane Injection Grouting and how we have helped many clients in resolving persistent leaks with this waterproofing technique.
To help you fully understand the purpose and application of Polyurethane Injection Grouting as a solution to resolve your waterproofing problems, it is essential to first understand the fundamentals of how water enters into a property through cracks as well as how to spot for water leakages in your very own homes.
Differentiating non-structural and structural cracks
Cracks are the most common gateways for water entry into a property. As previously mentioned, the differential movement between building elements could result in misaligned joints and cracks in the surface finish or waterproofing system which will cause water ingress and leakages into the interior of the property.
More often than not, home owners often face difficulties identifying the types of cracks present around their houses be it on the walls or ceilings. It is important to understand that cracks could merely be a cosmetic problem (e.g. surface paint crack) or it could actually indicate the presence of a serious structural issue.
A good practice to have would be to learn how to differentiate a structural crack from non-structural crack so that you can weigh the seriousness of the problem and apply the most appropriate solution to rectify it within the shortest time possible.
Non-structural cracks
Non-structural cracks are thin hairline cracks that are usually less than three millimetres in width. It is a common sight in homes across Singapore and it’s inevitable due to the frequent fluctuations in humidity levels and temperature changes. Imagine this, we are in our rooms with the air-conditioning turned on to avoid the heat, during which the internal surface of the wall would be cool. On the other hand, the external surface of the wall is hot as it is facing the afternoon sun. In the long run, given the frequent temperature and moisture changes in this same concrete wall, there is a movement of contraction and expansion which causes cracks to form in the wall. With cracks, water is now able to slowly seep into the interior over time.
Do note that although non-structural cracks might not be threatening to the building’s structural integrity at the moment, but it is still crucial to monitor and apply the necessary treatments quickly before the condition worsens. Water is able to travel through a small passage way such as a hairline crack as it often seeks for the passage of least resistance. Hence, these hairline cracks could quickly turn into structural cracks if water continues to seep through and erode the inner concrete.
Structural cracks
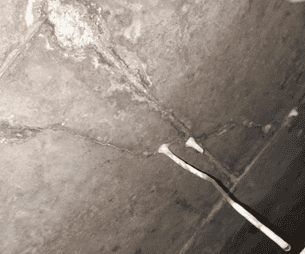
Structural cracks are generally longer and wider than three millimetres. They are easy to spot even from afar due to its size. For landed properties, they are often visible at external side walls as well as basement walls. These cracks can vary in orientations such as horizontal, vertical, diagonal and at times, shaped like a staircase. Structural cracks should be addressed promptly with the help from experts.
It is important for home owners to do a regular check around the house and carry out preventive maintenance or repairs works promptly to prevent further deterioration. It would be advisable to engage a waterproofing contractor for professional advice if home owners face difficulties diagnosing and resolving their water leakage problems on their own.
Common causes of cracks
Here are some of the most common causes of cracks in a property to give you a clearer understanding of how water can find its ways through these cracks into a building and cause leakage problems eventually:
Excess water in the concrete mix
During the construction process of a building, it is common for excess water to be present in the concrete mix. When excess water is used in the mix, it increases the chances for cracking tendency because too much water will increase shrinkage and reduce strength. As concrete hardens and dries, the excess water evaporates and leaves behind large voids between the solid particles. These empty spaces make the concrete weaker and more prone to cracking over time.
Hydrostatic Pressure
The vast majority of cracks in foundation walls, basement walls and ceilings are due to hydrostatic pressure. For foundation and basement walls, they face lateral pressure from the external soil surrounding them especially after heavy rain. The soil gets soaked with water and moisture, becomes heavier and exerts pressure on the basement walls, causing them to crack. With these cracks, there will be wall water leakages as the water find its way into the interior of the building. This is a common occurrence in landed housings with basement levels. For ceilings, especially if it is a wet area above such as bathroom, the constant contact of water with the floor surface might wear out the tile grouts and waterproofing system. Eventually, water will find its way down through the defective tile grouting or worn-out waterproofing and push through the surface, resulting in cracks and ceiling leakages. Hence, it is crucial to identify these ceiling leaks early and take the necessary steps in rectifying them before they worsen.
Thermal Movement
With fluctuations in humidity levels and temperature changes in Singapore, building materials expand on heating and contract on cooling, resulting in cracks to appear. Thermal movement are not as extensive in the internal walls and intermediate floors as compared to external walls. The external walls, outdoor balconies and roofs are exposed to rain and sun all year long, making it susceptible to substantial thermal variation which results in a higher possibility of cracks forming. Hence, if you have balcony or roof, do take extra care in checking and rectifying leaks periodically.
Signs of water leakages
Now that we understand more about the types of cracks and how these cracks are gateways for water entry, the next question would be “how can we ascertain if leakages are present?”. Here are some signs to help you identify water leakages and conduct necessary self-checks or engage professional waterproofing contractor to help resolve them:
Damp spots and discolouration on surfaces
Be it the wall or ceiling, if you find a damp spots or patches of discolouration, these could be signs of water leakages. If stains are on ceilings, it could be from the bathroom, concealed pipes in the floor slab or the roof above. If stains are on the wall, it could be from adjoining bathroom walls, external walls in frequent contact with rain or basement walls in contact with soil. These stains are only evident after the leak has been there for a while. Gently touch or feel the defective surface with your hands, if it’s damp or dripping constantly, it would most likely indicate presence of water leakages. Hence, once you identify these signs, you need to assess the severity of the leakages and address them soonest you notice them.
Peeling or blistering paint
If you start to see your surface paint peeling or blistering, it is likely that there is a leak somewhere from the wall or ceiling. This could happen to wallpaper finishes as well. The increasing moisture in the wall or ceiling cause the building element to bulge and thus, cracking the paint. Do a quick check behind that wall to see if there is any probable source of water such as water closet, basins, damaged floor tiles, etc. then observe how often it leaks (E.g. is it more serious after flushing of the water closet or using the basin?).
Presence of mould or musty smell
Musty smells are often due to presence of mould or mildew in the surfaces. This is exceptionally common in areas like underground basements. With presence of mould or mildew, this indicates that there are persistent water leakages in the area. The growth of mould could accelerate under ideal conditions (optimal temperature and level of humidity) and can quickly develop into fungi growth. Hence, it is crucial to take immediate actions to deter the growth.
Formation of Stalactites
If you have noticed water stains on your ceiling, take a look above the false ceiling access panel and you would most probably see the bottom of the concrete slab together with some water pipes, etc. From there, if you see stalactites formed around the concrete-pipe joints or along concrete slab joints, it means that there has been an existing ceiling leakage that has been on-going for a period of time. These stalactites are icicle-shaped formation with pointed tips produced by the calcium minerals from the water. It would be a strong sign of water leakages from the above and polyurethane injection grouting works need to be done promptly.
Increase in water bills
If you realise that your water bills are increasing over the months although water usage had remained consistent, there is a possibility that water leakage is present in your home somewhere. You can turn off all water supply and see if the water meter is still running. If so, it indicates that leakages are present. You can also try elimination method to trace to the source of leakage. For example, you have done a thorough check across the faucets, water closets, bidets, or even pipe surroundings in the false ceilings, and they are dry and not leaking. In that case, it could also be waterproofing system failure which allowed water to seep to the lower floor or adjoining walls. Hence, you would need to engage waterproofing professionals to diagnose the possible causes and rectify timely.
What is Polyurethane Injection Grouting?
Up until this section of the article, you must be thinking “so what exactly is this polyurethane grouting?”. Polyurethane Injection Grouting, also commonly known as PU injection grouting or PU grouting, is a technical waterproofing term used to stop water leakage and seepages with polyurethane resin mixture. It is often used to fill and seal structural joints and cracks in concrete slabs, walls and floors to stop water leakages and maintain the structure’s integrity in the long term.
PU injection grouting is popularly used given it’s fast drying properties and ability to reach tiny hairline cracks that are naked to the human eye when pumped under high pressure via the PU grouting machine. Moreover, it is a fast and affordable repair method that requires no hacking, reducing inconvenience to home owners. It is one of the most effective and long lasting methods of correcting almost all kinds of water leakages.
Areas for PU Injection grouting works
PU injection grouting is often proposed for various areas in the house to stop water ingress. Some of the most common areas where we would propose PU injection grouting include:
Pipe surroundings leakages
As the pipe and concrete slab are two separate entities, there is a joint between these two elements. Over time with wear and tear of the waterproofing or vibration in the slab, there is cracks or defects formed in this joint, and hence exposing the gap and allowing water to seep through and damage the ceiling. It is most commonly found in toilet ceilings.
Bathroom waterproofing
It is very common for waterproofing in bathroom to wear out due to the constant contact with water. Especially at shower areas. At times, the shower areas might not be constructed with sufficient gradient to drain off the water, that might result in water ponding and eventually wear out the tile grouting and waterproofing system. Hence, resulting in water seepage to the lower floor.
Ceiling Waterproofing
It is very common for ceiling leakages to occur especially if the space above is a wet area such as bathrooms. It could also be rainwater or water from damaged roof.
Roof Water Leakage
Roof is the most important element of a house as it serves as a protection to the home interior from the harsh weather conditions. If the roof is kept in good condition, it serves as a barrier against rain and debris. If not maintained properly, there could be cracks and damages which would result in roof water leakages into the interior of the house.
Balcony Water Leakage
Balconies are highly susceptible to rainwater, especially outdoor balconies. It is crucial to ensure that the balcony is built with sufficient gradient and drainage pipes to drain off rainwater. This will prevent water ponding which can potentially damage the waterproofing system over time and cause leakages to the space below.
Wall Water Leakage
At times, there could be defective pipes concealed within the walls which caused wall water leakage. You would need to engage a licensed plumber to carry out plumbing checks. Other times, if it is external-facing or retaining walls, they are susceptible to water from the rainwater or the sub-soil. Over time with wear and tear, water will seep through and cause wall water leakages.
Step-by-step: PU Injection Grouting Process
Here is a guide to the process of PU Injection Grouting to get a clearer understanding of how works would carried out when home owners engage SWC Construction for PU injection grouting works:
Site Inspection and Diagnosis
Upon receipt of enquiry from the owner, SWC Construction would arrange for a site inspection to assess the affected leakage area to propose the most appropriate treatments to resolve the leakages. At times, we would propose a water leakage thermal imaging technique to help pin-point leakage source especially if it is concealed within the walls.
Protection of work areas
PU injection grouting is a non-invasive method of repair and is relatively clean. However, there might be some dust and spillage of grout material during the works itself. Hence, prior to commencement of works, we would set up proper protection surrounding the work area to ensure that all furniture, floors and walls are covered with plastic sheets or cloths.
Drilling and insertion of packers
Before we can inject the PU chemical resin into the crack, we will need to drill holes at 45 degrees into the leakage areas (normally spaced approximately 1 foot apart). Thereafter, we will insert the metal injection packers into the drilled holes. These packers would be tightened with a hexagon wrench to ensure there is no gaps between the packers and holes for water to leak into.
PU grout injection
Our professional technicians will then attach the nozzle of the high pressure PU injection grouting machine to the metal injection packer and start injecting PU grout into the concrete at high pressure. Each injection port must be injected individually twice to ensure proper coverage of grout material within the concrete. Once the PU grout backflows out, it indicates that the PU grout has filled all cracks and voids within the concrete.
Removal of injection packers and sealing up
After the grouting process has been completed, we will leave the grout to dry. After which, all the metal injection packers will be removed. Our professional technicians will seal up the holes with waterproofing cement compound to ensure a smooth wall finish.
Warranty
To further validate our effective work and experience in the field, SWC Construction will provide a warranty period to ensure our work is 100% effective and has successfully rectified existing leakages with our professional PU injection Grouting Method.
PU Grouting VS Traditional Hacking Waterproofing
More often than not, home owners are torn between the two common options of waterproofing repairs: PU injection grouting or traditional hacking waterproofing works. Let us weigh them side-by-side and share some reasons why we often recommend PU Injection Grouting as the best and most effective method for resolving water leakage issues.
Advantages of PU Injection Grouting
Fuss-free and Non-invasive
As previously mentioned, PU Injection Grouting involves drilling of grouting packers at the affected areas or crack lines and thereafter, injecting the chemical resin into the grouting packers at high pressure. Once the chemical resin comes into contact with water, it can expand up to 10 times its original volume to fill up these voids or cracks. This forms a new waterproofing barrier to effectively block out water seepage into the internal surfaces. With this modern PU injection grouting method, there is no need to hack your walls, floor or ceiling. When works are in progress, noise and dust pollutions are kept minimal, making it a fuss-free and non-invasive waterproofing process.
Fast and effective
PU grouting works are relatively fast and effective. To put things in context, a typical PU grouting to the concrete slab around a leaking pipe surrounding can be completed within a day, from preparation to the actual PU injection grouting process to making good of surface and handover. This reduces inconvenience to home owners, resolving their resistant leakage problems promptly.
Affordable
Given the nature of works involved when we carry out PU injection grouting, there are no hacking, re-screed or re-tiling works required. With this, PU grouting is generally a fraction of traditional hacking waterproofing costs.
Long Lasting
Because of the strong adhesiveness property of polyurethane, it can form a very strong bond with the concrete or cement surfaces. Additionally, the chemical resin retains its flexibility after the injection. This would allow for subsequent movement in the structure, keeping the voids sealed and lower the chances of cracks happening again. With these, a properly executed PU injection grouting work has a lifespan of up to 10 years.
Disadvantages of PU Injection Grouting
Niche and professional
PU injection grouting is a technique to be carried out only by professionals with relevant expertise and skills, using professional PU injection grouting machines. As it is a very niche and technical method, it is important for home owners to engage waterproofing contractors who have the right skill set and experience to solve their leakage problems.
Advantages of traditional hacking waterproofing
Long lifespan
Given that the leakage area is fully hacked and replaced with new waterproofing system, a properly executed hacking waterproofing works has a lifespan of up to 20 years if completed properly.
Disadvantages of traditional hacking waterproofing
Expensive
Imagine this, in order to replace the defective waterproofing system, you would first need to hack the top most layer of floor tiles before you can hack the waterproofing and screed layers. Thereafter, you will need to prepare the surface, re-screed, re-apply the new waterproofing system before you finish with floor tiles. Not forgetting that the toilet perimeter wall tiles as well as the other accessories including basin, bathtubs, etc. might also be affected during the hacking, and would require replacement and make good as well. With all these in mind, the work required is extensive and time-consuming (approximately 2 to 3 weeks depending on the size of the toilet as well as the scope of works). Hence, it’s a very expensive method of waterproofing repair.
Noisy, dusty and dirty
With all the hacking required, it is inevitable that there will be a lot of dust and dirt around the repair area. Even with plastic sheet protection, it would also not be able to block off the noises from hacking. This would cause inconvenience and nuisance to the owner and neighbouring units.
Time-consuming
For this method of waterproofing, it generally required a minimum of 1 week to complete. If the works is carried out in the bathroom or kitchen, imagine the inconvenience and disturbances caused to living as these areas would be out of bound for the owner.
It is vital for home owners to weigh these factors before deciding on which method of repair to adopt. There have been concerns from home owners who have felt or heard that PU Injection Grouting is not a long lasting option as compared to the traditional hacking waterproofing method. One thing is for sure – nothing in the world is forever. Waterproofing has its own lifespan too. With our many years of experience in this field, we have tested and proven the effectiveness of PU injection grouting and seen how this technique has solved the most persistent leaks one could find. Hence, home owners need to understand these and weigh out their options.
Case Studies: Our project references
Over the years, we have done many PU injection grouting works at residential (public and private housings), commercial and industrial properties. With all of the information shared above, let us put things into context and walk you through some of the past PU injection grouting projects to better illustrate the applications and effectiveness of this waterproofing technique.
Case Study 1: PU injection grouting to toilet ceiling
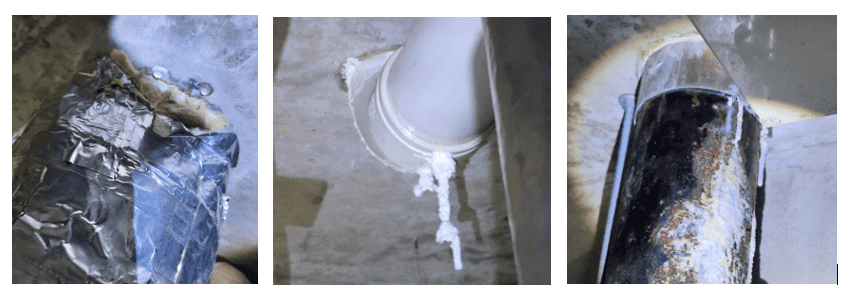
Leakage problem: Our client’s lower unit neighbour was facing severe ceiling leakage problems in their common toilet due to worn-out waterproofing system surrounding the pipes. During our site inspection, several tell-tale signs included visible water droplets on the concrete slab surface near the pipe as well as stalactites formed on two pipes. This meant that the water leakage had been gradual but present for quite a period of time in order for these stalactites to form.
Solution: Hence, for such inter-floor leakages, we proposed to carry out PU injection grouting to the reinforced concrete slab around the leaking areas from the lower unit. After drilling in the metal packers and pumping in the PU chemical resin, the PU was seen filling up the cracks around the slab and successfully stopped water ingress. Thereafter, our professional technicians made good the affected ceiling boards and finished with close matching paint. At the upper unit, we also applied Clear Penetrative Waterproofing Treatment to the toilet wall and floor areas to form a waterproofing layer at the shower area to help prevent future water ingress.
Case Study 2: PU Injection grouting to wall-and-floor joint
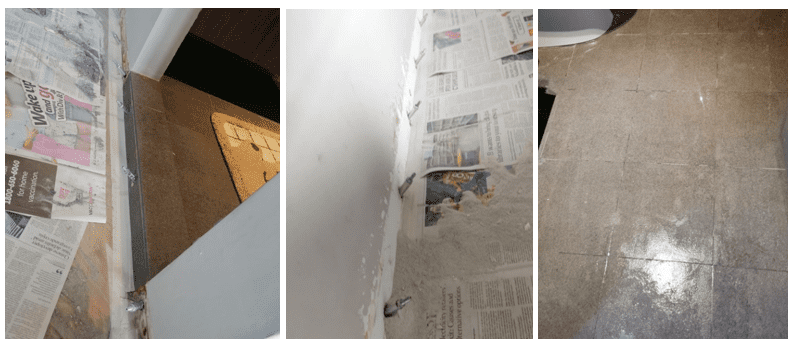
Leakage problem: Our client was facing leakages around the toilet entrance. During our site inspection, there was water present surrounding the bottom parts of walls and also seeping out from the tiles outside of the toilet. We deduced that the waterproofing barrier between the wall-and-floor joint surrounding the toilet might be defective which caused water to seep through and appear on the outside perimeter.
Solution: As it is more effective to inject PU directly at the joint instead of the wall above the skirting, we removed the existing perimeter skirting (wherever affected by the water leakage) and carried out the PU injection grouting works along the joint. The metal packers were inserted about a foot apart from each other and chemical resin was injected at high pressure. Once completed, we made good the area and painted with closest matching paint. Thereafter, we also helped to double check the tile grouting inside the toilet and touch up where necessary as the existing grouting were already in relatively good condition. We also applied Clear Penetrative Waterproofing Treatment to the toilet wall and floor areas to form a waterproofing layer to prevent future water ingress.
Case Study 3: PU Injection grouting to car porch balcony
Leakage problem: Client was facing water leakages at their car porch area due to water leakage from the bottom of the balcony slab. During our site inspection, there were visible crack lines when we looked up to the ceiling of this balcony slab. Water was seen dripping down from the cracks after rain although the rain had stopped. There were also very evident water stain marks on the surface. We went up to inspect this balcony from Level 2 and also noted that it is not sheltered.
Solution: The old tiles and screed at the L2 balcony was first hacked off until the bare concrete level. Thereafter, we carried out PU injection grouting from L1 under the balcony slab along the cracks and leakage areas so as to seal up cracks and crevices within the concrete slab itself. When we injected PU from the bottom of the balcony slab, PU chemical resin was seen flowing out from the top of the balcony slab, indicating that the voids or cracks present within the slab have been successfully filled. Following this, we went back to up to L2 balcony to touch up the hacking to ensure high standard of surface preparation. As the cracks are width, we also constructed angle fillers and patched up all major cracks or holes. Then, we applied two coats of cementitious waterproofing membrane onto the balcony area before the tilers came back to complete the re-screed and tiling works.
Clients’ testimonials of our work quality
SWC Construction continually strives to provide high quality waterproofing solutions and services to help our clients resolve persistent leaks promptly. We understand that these water leakages can cause inconvenience to home owners, which is why we often advocate them to reach out to the right professional waterproofing specialist timely to advise and provide the most effective treatment and solutions. Click here for our clients’ reviews and hear what they have to say about our works.
Common questions about PU Injection Grouting
Before we end off, here are some of the questions which home owners commonly ask with regards to PU Injection Grouting.
Q1. Is the PU injection grouting process very messy and dusty?
SWC Construction ensures that proper protection is in place prior to commencement of works. Plastic sheets will be set up to protect floors, walls, furniture, etc. throughout the process. During works, noise and dust are kept to minimum. Moreover, PU injection grouting only requires minor drilling at the start to insert the metal packers into the concrete slab. During the injection process, noises are kept minimal. Once works are completed, we will clean up the work area to ensure cleanliness.
Q2. How long does the PU injection grouting process take?
This would be dependent on the scale of leakage. A typical PU injection grouting works to one area of leak (example, pipe surrounding of a drainage pipe) can be completed within one working day.
Q3. How long can PU Injection grouting last for?
If PU injection grouting is carried out properly by professional specialists, it can last for 10 years.
Q4. How should I decide between PU Injection grouting and traditional hacking waterproofing?
PU Injection grouting is a straight-forward and efficient waterproofing solution which we highly recommend. Although it is not wrong to opt for a full traditional hacking waterproofing given that all the waterproofing system will be brand new, it can be a very time-consuming and expensive method. A practical thing to do would be to call up a waterproofing specialist, get them to conduct a site inspection at your home so as to better assess the condition of leaks before advising the most appropriate and effective solution.
Seek professional advice
PU injection grouting has become a very popular waterproofing technique over the last couple of decades and is often considered to be the most effective solution in stopping water ingress into a building. It is often deemed as an essential in the construction industry and is also largely practiced by waterproofing contractors. However, it has to be emphasized that PU injection grouting is a technique to be carried out only by professionals with relevant expertise and skills, using professional PU injection grouting machines.
With over 20 years of experience in this field, our waterproofing skills and expertise have been tested, refined and proven. As a waterproofing specialist, there’s no water leakage problem we are unable to solve.
Take a walk around your home today and look out for any water seepages or leakages. If you have identified any leakages which you need a professional advice on, feel free to contact SWC construction for a free non-obligatory on-site consultation to solve all your leakage concerns.


